
Auto Parts Search

1999 Honda CR-V CAR/TRUCK REPAIR PROCEDURES AND DIAGRAMS - WHAT Honda REPAIR SHOPS DON'T WANT YOU TO KNOW
Learn how to repair a car or truck, install or remove parts, wire an engine, reset warning lights, replace fuel filter, fix auto body and more. Get Automotix DIY!Select Section
- Component Locations
- Wiring Diagrams
- Technical Service Bulletins
- Specifications
- A/C & Heater Service
- Brake Service
- Fuel Filter Replacement
- Driveline, U-Joint & CV Axles Replacement
- Starter & Alternator Replacement
- Cabin Air Filter Locations & Replacement
- Maintenance Lamp Reset
- Radiator & Hose Replacement
- Serpentine Belt Service
 Automotix DIY provides automotive consumers and do it yourselfers; the most comprehensive repair information about 1999 Honda CR-V car and truck
repair procedures including Honda engine diagrams, wiring diagrams, repair work estimating measures, technical service bulletins, auto body work
guidance, starter & alternator replacement procedures, serpentine belt replacement procedures, radiator & hose replacement procedures, tune-up &
drivability specifications, quick lube illustrations, preventive maintenance guide, engine light reset instructions, parts removal and install
procedures, fuel filter replacement directions, component location diagrams, air filter locations & replacement instructions, a/c
system specifications, and general auto service procedures. You don't have to be a car mechanic or technician to know how to fix
your Honda CR-V automobile. Try the Automotix DIY solution today!
Automotix DIY provides automotive consumers and do it yourselfers; the most comprehensive repair information about 1999 Honda CR-V car and truck
repair procedures including Honda engine diagrams, wiring diagrams, repair work estimating measures, technical service bulletins, auto body work
guidance, starter & alternator replacement procedures, serpentine belt replacement procedures, radiator & hose replacement procedures, tune-up &
drivability specifications, quick lube illustrations, preventive maintenance guide, engine light reset instructions, parts removal and install
procedures, fuel filter replacement directions, component location diagrams, air filter locations & replacement instructions, a/c
system specifications, and general auto service procedures. You don't have to be a car mechanic or technician to know how to fix
your Honda CR-V automobile. Try the Automotix DIY solution today!
A/C & HEATER SERVICE PROCEDURES FOR 1999 Honda CR-V AUTOMOBILES
Honda -> Component Replacement & Adjustment -> Cabin Air Filter, Replace -> 1999-2000 -> Accord -> CR-V -> Odyssey -> Prelude
Vehicle: 1999 Honda CR-V EX 2.0 L4 GAS
Refer to "Rodeo" for "Honda Passport" information.
Accord
- Remove glove compartment as outlined under "Heater Core, Replace."
- Remove mounting bolt, screws and glove compartment frame.
- Remove evaporator core lid and filter assembly.
- Remove filter from assembly.
- Reverse procedure to install.
CR-V
- Remove glove compartment and frame as outlined under "Evaporator Core, Replace."
- Disconnect wire harness from clamps.
- Remove lid and filter unit.
- Remove filter from housing.
- Reverse procedure to install.
CLICK HERE TO GET FULL ACCESS TO 1999 Honda CR-V A/C & HEATER SERVICE PROCEDURES
BRAKE SERVICE PROCEDURES FOR 1999 Honda CR-V AUTOMOBILES
Disc Brakes -> Description
Vehicle: 1999 Honda CR-V EX 2.0 L4 GAS
The caliper assembly consists of a pin slider caliper housing, inner and outer pad and lining assemblies and a single piston. The caliper slides on two pins which also act as attaching bolts between the caliper and caliper br...
CLICK HERE TO GET FULL ACCESS TO 1999 Honda CR-V BRAKE SERVICE PROCEDURES
FUEL FILTER REPLACEMENT PROCEDURES FOR 1999 Honda CR-V AUTOMOBILES
Honda -> Component Locations -> 1996-97 Accord w/2.2L & 2.3L Engines & 1997-01 CR-V & Prelude
Vehicle: 1999 Honda CR-V LX 2.0 L4 GAS
CLICK HERE TO GET FULL ACCESS TO 1999 Honda CR-V FUEL FILTER REPLACEMENT PROCEDURES
DRIVELINE, U-JOINT & CV AXLES REPLACEMENT PROCEDURES FOR 1999 Honda CR-V AUTOMOBILES
CV AXLE SHAFT, Replace -> Front
Vehicle: 1999 Honda CR-V EX 2.0 L4 GAS
Front
- Loosen wheel nuts slightly.
- Raise and support vehicle and support it with safety stands in proper locations.
- Remove wheel nuts and front wheels.
- Drain transmission fluid and reinstall drain plug using a new washer. Its not required to drain transmission fluid if lefthand driveshaft is removed.
- Lift up locking tab on spindle nut then remove nut.
- Remove self-locking nut and flange bolt.
- Remove bolts securing dampner fork.
- Remove cotter pin from lower arm ball joint castle nut and remove nut.
- Install a 12 mm hex nut on ball joint. Ensure that hex nut is flush with ball joint pi...
CLICK HERE TO GET FULL ACCESS TO 1999 Honda CR-V DRIVELINE, U-JOINT & CV AXLES REPLACEMENT PROCEDURES
STARTER & ALTERNATOR REPLACEMENT PROCEDURES FOR 1999 Honda CR-V AUTOMOBILES
Alternator, Replace
Vehicle: 1999 Honda CR-V LX 2.0 L4 GAS
- Disconnect battery ground cable, then disconnect positive cable at battery.
- Disconnect 4P (or 3P) connector from alternator.
- Remove terminal nut and WHT wire from B terminal.
- Remove adjusting bolt and through bolt nut, then remove alternator be...
CLICK HERE TO GET FULL ACCESS TO 1999 Honda CR-V STARTER & ALTERNATOR REPLACEMENT PROCEDURES
CABIN AIR FILTER LOCATIONS & REPLACEMENT PROCEDURES FOR 1999 Honda CR-V AUTOMOBILES
Cabin Air Filter Service -> Honda -> 1997-2001 CR-V
Vehicle: 1999 Honda CR-V LX 2.0 L4 GAS
The cabin air filter should be replaced every 30,000 miles or 24 months. If the vehicle is operated primarily in urban areas with high concentrations of soot and diesel powered vehicles, replace the filter every 15,000 miles. The filter should be replaced more often if air flow is less than normal.
- On models equipped with radio anti-theft feature, prior to disconnecting the battery ground cable make sure you have the radio anti-theft code.
- On all models, disconnect and isolate the battery ground cable. After disconnecting the battery ground cable wait at least 3 minutes to allow th...
CLICK HERE TO GET FULL ACCESS TO 1999 Honda CR-V CABIN AIR FILTER LOCATIONS & REPLACEMENT PROCEDURES
MAINTENANCE LAMP RESET PROCEDURES FOR 1999 Honda CR-V AUTOMOBILES
Honda -> Anti-Lock Brake System (ABS)/VSA System Warning Lamp -> 1997-2001 CR-V
Vehicle: 1999 Honda CR-V LX 2.0 L4 GAS
The Anti-Lock warning lamp is used to warn of a system fault. The lamp monitors the condition of the anti-lock brake system. It will be lit during engine start-up, but should go off when the self-diagnostic system determines that the system is operating properly. If the lamp remains lit, a fault in the anti-lock brake system is indicated. After diagnosis and repair of the system, the lamp may be turned off as follows:
- Place ignition switch in Off position.
- Connect service connector 07PAZ-0010100, or equivalent, to service check connector, Fig. ...
CLICK HERE TO GET FULL ACCESS TO 1999 Honda CR-V MAINTENANCE LAMP RESET PROCEDURES
RADIATOR & HOSE REPLACEMENT PROCEDURES FOR 1999 Honda CR-V AUTOMOBILES
Heater Hose, Replace -> Bypass -> Inlet -> Outlet
Vehicle: 1999 Honda CR-V EX 2.0 L4 GAS
Inlet
- Disconnect negative cable from battery terminal.
- Drain engine coolant into a suitable container.
- Reposition hose clamp with suitable tool.
- Remove hose from heater core tube.
- Reposition hose clamp with suitable tool.
- Remove hose from heater valve tube.
- Reverse procedure to install.
Outlet
- Disconnect negative cable from battery terminal.
- Drain engine coolant into a suitable container.
- Reposition hose clamp with ...
CLICK HERE TO GET FULL ACCESS TO 1999 Honda CR-V RADIATOR & HOSE REPLACEMENT PROCEDURES
SERPENTINE BELT SERVICE PROCEDURES FOR 1999 Honda CR-V AUTOMOBILES
Serpentine Drive Belt, Replace
Vehicle: 1999 Honda CR-V LX 2.0 L4 GAS
- Rotate or lift the belt tensioner arm, using a suitable tool to relieve tension from dr...
CLICK HERE TO GET FULL ACCESS TO 1999 Honda CR-V SERPENTINE BELT SERVICE PROCEDURES
COMPONENT LOCATION DIAGRAMS FOR 1999 Honda CR-V AUTOMOBILES
Component location diagrams for most 1999 Honda CR-V cars and light trucks sold in the U.S. from 1990+.
 Secondary Heated Oxygen Sensor & Interior Wiring Harness Connector Locations Diagram for 1999 Honda CR-V LX 2.0 L4 GAS Secondary Heated Oxygen Sensor & Interior Wiring Harness Connector Locations Diagram for 1999 Honda CR-V LX 2.0 L4 GASComponents on diagram: |
 Left I/P Main Wiring Harness Connector Locations Diagram for 1999 Honda CR-V LX 2.0 L4 GAS Left I/P Main Wiring Harness Connector Locations Diagram for 1999 Honda CR-V LX 2.0 L4 GASComponents on diagram: |
CLICK HERE TO GET FULL ACCESS TO 1999 Honda CR-V PARTS/COMPONENTS LOCATION DIAGRAMS!
WIRING DIAGRAMS FOR 1999 Honda CR-V AUTOMOBILES
OEM drawn wiring diagrams for most 1999 Honda CR-V cars and light trucks sold in the U.S.
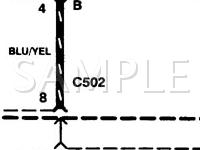 1999 Honda CR-V LX 2.0 L4 GAS Wiring Diagram 1999 Honda CR-V LX 2.0 L4 GAS Wiring DiagramComponents on diagram: |
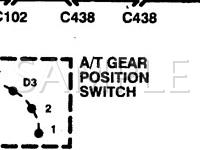 1999 Honda CR-V LX 2.0 L4 GAS Wiring Diagram 1999 Honda CR-V LX 2.0 L4 GAS Wiring DiagramComponents on diagram: |
CLICK HERE TO GET FULL ACCESS TO 1999 Honda CR-V WIRING DIAGRAMS!
TECHNICAL SERVICE BULLETINS FOR 1999 Honda CR-V AUTOMOBILES
OEM TSB listings for most 1999 Honda CR-V cars and light trucks sold in the U.S. from 1985+.
|
Document: ATEQ VT55 TPMS Update Information Vehicle: 1999 Honda CR-V EX 2.0 L4 GAS Auto Systems: |
|
Document: ED-18 Battery Analyzer Update Information Vehicle: 1999 Honda CR-V EX 2.0 L4 GAS Auto Systems: |
CLICK HERE TO GET FULL ACCESS TO 1999 Honda CR-V TECHNICAL SERVICE BULLETINS!
COMPONENT/PARTS SPECIFICATIONS FOR 1999 Honda CR-V AUTOMOBILES
BRAKE SPECIFICATIONS: Brake drum, rotor, caliper, and related specifications for most 1999 Honda CR-V cars and light trucks sold in the U.S. and Canada from 1970+.
- Brake caliper mounting bolt torque
- Brake drum runout, machining, & discard specs
- Minimum brake lining thickness.
- Brake rotor runout, parallelism, machining, discard, & finish specs
A/C SYSTEM SPECIFICATIONS: Air conditioning refrigerant capacity and type as well as lubricant capacity for most 1999 Honda CR-V cars and light trucks sold in the U.S. and Canada from 1980+.
- Refrigerant capacity & type, compressor oil viscosity, total system oil capacity & compressor clutch gap
COOLING SYSTEM BLEED: Cooling system bleeder valve identification, bleeder type and bleed procedures for most domestic and imported cars and light trucks sold in the U.S. and Canada from 1986+.
PREVENTIVE MAINTENANCE: Preventive maintenance recommendations and required services for most domestic and imported cars and light trucks sold in the U.S. and Canada from 1980+. Includes severe and routine service schedules
QUICK-LUBE and ILLUSTRATIONS: Fluid recommendations, capacities, drain plug torques, tire data, and severe service recommended preventive maintenance schedules. Information covers most 1999 Honda CR-V cars and light trucks sold in the U.S. and Canada from 1980+. Engine and chassis service images.
- Automatic transmission/transaxles capacities, lubricant recommendations
- Differential/final drive capacities, lube recommendations, grades, & viscosities
- Final drive fill & drain plug torques
- Number of lubrication fittings & plugs
- Power steering, brake, & clutch fluid recommendations
- Manual transmission/transaxle capacities, lube recommendations, grades, & viscosities
- Number of lubrication fittings & plugs
- Power steering, brake, & clutch fluid recommendations
- Engine oil capacities, API grade recommendations, SAE viscosity recommendations, drain plug torque
- Severe service maintenance & interval recommendations
- Tire sizes, wheel nut/bolt torque, pressures & rim sizes
- Transfer case capacities, lube recommendations, grades, & viscosities
TUNE-UP & DRIVEABILITY SPECIFICATIONS: Most tune-up specifications for most 1999 Honda CR-V cars and light trucks sold in the U.S. and Canada from 1980+
- Airflow sensor electrical specifications
- Tensioning specifications for systems with automatic tensioners
- Barometric pressure sensor specs
- Battery group number and cranking performance
- Crankshaft & camshaft position sensor resistance
- Engine compression pressures
- Coolant temperature sensor specs
- Computer advance.
- Diesel fuel temperature sensor resistance.
- Distributor advance specifications
- Ignition pickup coil resistance
- Exhaust gas recirculation temperature sensor resistance
- Engine fastener torque values
- Firing order diagrams
- Fuel system pressures
- Generator (alternator) specs
- Intake air temperature sensor specs
- Ignition coil specifications
- Fuel injector resistance
- Engine idle speeds
- Knock sensor resistance
- Manifold absolute pressure sensor specs
- Mixture control solenoid resistance
- Voltage regulator specs
- Spark plug applications & gaps
- Starter motor electrical specs.
- Tensioning specifications for systems without automatic tensioners
- Throttle body temperature sensor resistance
- Ignition timing in degrees at rpm
- Transmission oil temperature sensor resistance
- Throttle position sensor specs
- Vacuum sensor valve specs
CLICK HERE TO GET FULL ACCESS TO 1999 Honda CR-V SPECIFICATIONS DATA!
Shop online for auto body parts, engines, wheels, lights...
| More parts |
| Get the Complete Technical Service Bulletins! |
 Access diagrams and repair information such as wiring diagrams,
diagnosis and repair charts, manufacturer
service bulletins, and OEM Part
numbers of your 1999 Honda CR-V vehicle. Access diagrams and repair information such as wiring diagrams,
diagnosis and repair charts, manufacturer
service bulletins, and OEM Part
numbers of your 1999 Honda CR-V vehicle.
|
| Access the Complete guide! |
